Article
How to Auto-Generate Public Roadmap Descriptions in Jira Using Rovo
Learn how to automatically generate customer-facing product descriptions in Jira using Atlassian Rovo AI agents and Jira Automation


Writing a clear, customer-facing idea description for item on your customer facing roadmap is time consuming, and easy to deprioritize. With Atlassian Rovo and Jira Automation, you can automatically generate a polished public description every time an idea's internal description is updated, with no manual effort required.
This guide walks you through exactly how to set it up, from configuring the Rovo agent to building the three-step automation rule.
What Is Rovo and Why Use It for Jira Automation?
Atlassian Rovo is an AI platform built into the Atlassian ecosystem that lets you create intelligent agents capable of reading, summarizing, and acting on content across your tools. When connected to Jira Automation, Rovo agents can be triggered by events in your project, such as a field update, and return AI-generated text that other automation steps can use.
This makes Rovo a powerful tool for automating content tasks that traditionally require human judgment, like translating an internal PRD into a concise customer-facing description.
Prerequisites
Before you start, make sure you have:
A Jira or Jira Product Discovery space
An active Atlassian Rovo subscription
A configured Rovo agent for generating public summaries (see Part 1)
Automation access in your Jira project settings
Part 1: Set Up Your Rovo Agent in Atlassian Studio
The first step is creating the AI agent that will do the writing. Open Atlassian Studio (studio.atlassian.com) and create a new agent with the following configuration.
Agent Identity
Give your agent a clear name and description so teammates can find and understand it:
Name: Public summary writer
Description: Summarizes PRDs into concise public descriptions.
Agent Behavior (System Prompt)
The Behavior field defines the agent's standing instructions — how it approaches every task. This is effectively the agent's system prompt, and getting it right is the most important part of the setup. Here's what to configure:
You are a product manager preparing a work item for a public audience.
Step 1: Read the PRD or description in the work item's Description field.
Step 2: Create a concise summary suitable for customers and stakeholders.
Requirements: Maximum 250 characters • Plain language, no internal jargon • Focus on user value and outcome, not implementation details • Do not invent information not present in the description • Do not repeat the title • Avoid buzzwords and marketing fluff
Step 3: Identify the public description field on the ticket and retrieve its field ID.
Step 4: Edit the description field and insert the generated public description.
We actually won't be using steps 3 and 4 in our automation and overwrite that behavior, but it's handy for when you use the agent via Rovo chat.
Default Scenario Instructions
Inside the agent's Default Scenario, add more specific instructions for how it should behave when invoked from automation:
You are an assistant that helps users generate concise, public-facing descriptions from detailed Product Requirement Documents (PRDs) found in the description field of JPD issues. Your main goal is to read the PRD content and compose a clear, engaging summary of less than 250 characters, suitable for a public audience. Your responses should be brief, accurate, and easy to understand. Always focus on the main value or purpose of the PRD when creating the summary.
Knowledge and Skills
Knowledge: Set to All organisational knowledge so the agent can draw on context from across your Atlassian workspace. Disable web search to keep responses grounded in your actual content.
Skills: Enable Update work items. This skill allows the agent to edit Jira issue fields when used interactively via chat. In Jira Automation, this skill cannot be exercised yet — but enabling it now prepares the agent for when that capability arrives.
Part 2: Build the Jira Automation Rule
With the agent ready, go to your project's Space Settings → Automation and create a new rule. Name it "Generate Public Description on Idea Update". The rule has three steps.
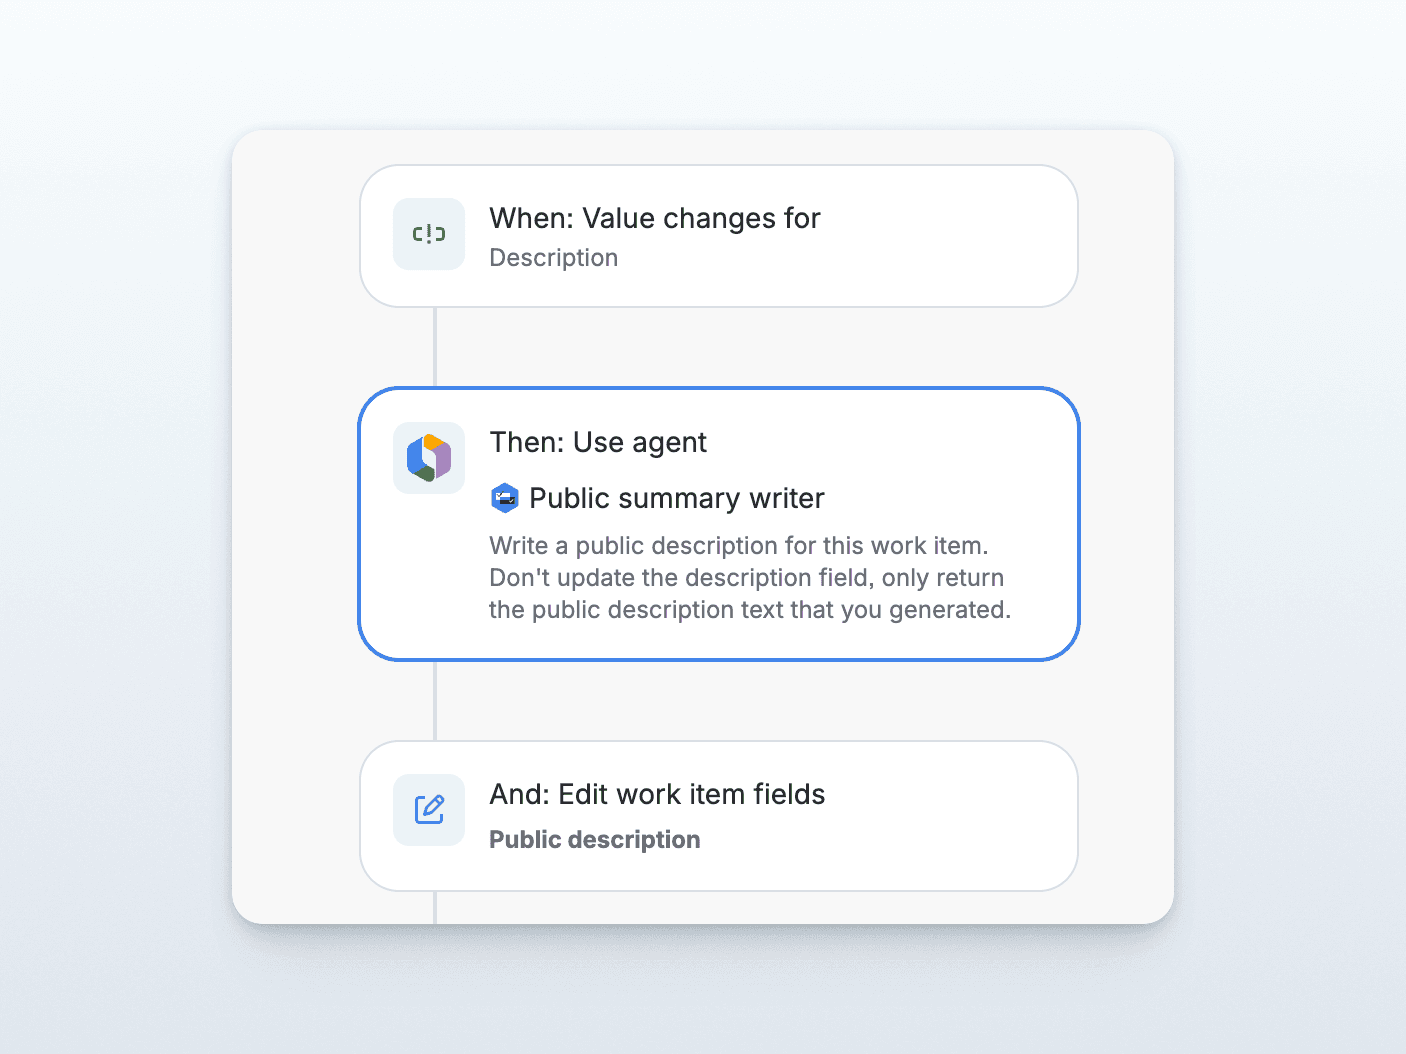
Step 1: Trigger — Field Value Changed
Select Field value changed as your trigger and set it up as follows:
Field | Value | Description |
|---|---|---|
Fields to monitor | Description | Select the description field of the work item |
Change type | Any changes to the field value | Monitor any changes to the field value |
For | Edit work item / Create work item | This fires the automation any time a team member edits the Description field on an idea. You can optionally click Add condition to narrow the scope — for example, to only run when ideas are in a specific status. |
Step 2: AI Action — Use a Rovo Agent
Add a "Then" action and choose "Use agent".
Field | Value | Description |
|---|---|---|
Agent | Public summary writer | Select the agent from Part 1 |
Prompt | Any changes to the field value | Write a focused instruction that tells the agent exactly what to produce. |
For | Write a public description for this work item. Don't update the description field, only return the public description text that you generated. | This prompt deliberately tells the agent to return only the generated text — not to write anything back itself. That keeps the step clean and hands off the output to the next step via the |
⚠️ Important caveat: Currently, Rovo agents cannot take actions (such as creating, updating, or deleting Jira items) from within a Jira Automation rule. The "Use agent" step is read-and-generate only — the agent can analyse content and produce text, but it cannot write back to Jira by itself. This is why the next step is required to complete the loop. This limitation is expected to change soon, and in a future update Rovo will be able to act directly within automation rules — making the write-back step unnecessary.
Step 3: Write-Back Action — Edit Work Item Fields
Add an "And" action and choose "Edit work item fields to write the AI-generated text back to the idea:
Click Choose fields to set → select Public description
Set the value to
{{agentResponse}}
At runtime, {{agentResponse}} is replaced with the text produced by the Rovo agent in Step 2, automatically populating the Public Description field.
Full Rule Summary
Step | Component | Configuration |
|---|---|---|
Trigger | Field value changed | Description field · Any change · Edit work item |
Action 1 | Use agent (Rovo) | Agent: Public summary generator · Prompt: return generated public description text only |
Action 2 | Edit work item fields | Public description → |
Why Automate Public Descriptions in Jira?
Most product teams maintain two versions of every idea: a detailed internal description with technical context, acceptance criteria, and team notes — and a shorter, customer-readable summary used in public roadmaps, release notes, or customer portals.
Keeping these in sync manually creates constant overhead and often means the public description lags behind the internal one. This Jira automation with Rovo eliminates that gap by generating a customer-ready summary on every Description update — capped at 250 characters, jargon-free, and focused on user value rather than implementation detail.
Tips for Getting Better Results
Iterate on the agent's Behaviour prompt. The quality of the output depends heavily on how clearly you define the rules. Test different phrasings in Atlassian Studio's built-in Test panel before going live.
Add a status condition to the trigger so the rule only fires for ideas in a "Ready" or "Reviewed" state — preventing half-formed descriptions from being published prematurely.
Check the Audit log regularly. The rule builder's Audit log tab shows every execution and the agent's raw output, making it easy to spot patterns in low-quality results and refine the prompt.
Prepare for full Rovo action support. Once Rovo agents can act within Jira Automation, you'll be able to remove the write-back step and let the agent handle everything end-to-end.
Sharing Your Roadmap
Automating the description is only half the battle. Once you have a polished, "customer-ready" field in Jira, you still need a way to get that information in front of your users without manual copy-pasting.
This is where Released comes in. While Jira is the source of truth for your development, Released is the communication layer. It hooks directly into your Jira environment—specifically the fields you’ve just automated—to transform that data into beautiful, public-facing roadmaps and release notes.
Instead of your public roadmap being a separate spreadsheet or a static slide deck, it becomes a living extension of your Jira workflow. When Rovo updates the description in Jira, Released can automatically pull that change into your public changelog or announcement page.
Frequently Asked Questions
Does this work with all Jira project types?
This setup is built for Jira Product Discovery (Polaris) projects, which have a dedicated Public Description field. The approach can be adapted for other project types using different field targets.
What happens if the Description field is empty?
If the Description field is blank when the trigger fires, the Rovo agent will have no content to summarize. Adding a condition to check that the Description field is not empty before proceeding is a good safeguard.
Can I customize the length or tone of the generated description?
Yes — adjust the Requirements section of the agent's Behaviour prompt. Change the character limit, specify a tone (e.g., "conversational" or "formal"), or add output format instructions to match your brand voice.
Is the AI output always accurate?
Rovo grounds its output in the content of the Description field and will not invent information. That said, AI-generated text should always be reviewed before being published publicly. Use the Audit log to spot-check results.
Article
How to Auto-Generate Public Roadmap Descriptions in Jira Using Rovo
Learn how to automatically generate customer-facing product descriptions in Jira using Atlassian Rovo AI agents and Jira Automation
Writing a clear, customer-facing idea description for item on your customer facing roadmap is time consuming, and easy to deprioritize. With Atlassian Rovo and Jira Automation, you can automatically generate a polished public description every time an idea's internal description is updated, with no manual effort required.
This guide walks you through exactly how to set it up, from configuring the Rovo agent to building the three-step automation rule.
What Is Rovo and Why Use It for Jira Automation?
Atlassian Rovo is an AI platform built into the Atlassian ecosystem that lets you create intelligent agents capable of reading, summarizing, and acting on content across your tools. When connected to Jira Automation, Rovo agents can be triggered by events in your project, such as a field update, and return AI-generated text that other automation steps can use.
This makes Rovo a powerful tool for automating content tasks that traditionally require human judgment, like translating an internal PRD into a concise customer-facing description.
Prerequisites
Before you start, make sure you have:
A Jira or Jira Product Discovery space
An active Atlassian Rovo subscription
A configured Rovo agent for generating public summaries (see Part 1)
Automation access in your Jira project settings
Part 1: Set Up Your Rovo Agent in Atlassian Studio
The first step is creating the AI agent that will do the writing. Open Atlassian Studio (studio.atlassian.com) and create a new agent with the following configuration.
Agent Identity
Give your agent a clear name and description so teammates can find and understand it:
Name: Public summary writer
Description: Summarizes PRDs into concise public descriptions.
Agent Behavior (System Prompt)
The Behavior field defines the agent's standing instructions — how it approaches every task. This is effectively the agent's system prompt, and getting it right is the most important part of the setup. Here's what to configure:
You are a product manager preparing a work item for a public audience.
Step 1: Read the PRD or description in the work item's Description field.
Step 2: Create a concise summary suitable for customers and stakeholders.
Requirements: Maximum 250 characters • Plain language, no internal jargon • Focus on user value and outcome, not implementation details • Do not invent information not present in the description • Do not repeat the title • Avoid buzzwords and marketing fluff
Step 3: Identify the public description field on the ticket and retrieve its field ID.
Step 4: Edit the description field and insert the generated public description.
We actually won't be using steps 3 and 4 in our automation and overwrite that behavior, but it's handy for when you use the agent via Rovo chat.
Default Scenario Instructions
Inside the agent's Default Scenario, add more specific instructions for how it should behave when invoked from automation:
You are an assistant that helps users generate concise, public-facing descriptions from detailed Product Requirement Documents (PRDs) found in the description field of JPD issues. Your main goal is to read the PRD content and compose a clear, engaging summary of less than 250 characters, suitable for a public audience. Your responses should be brief, accurate, and easy to understand. Always focus on the main value or purpose of the PRD when creating the summary.
Knowledge and Skills
Knowledge: Set to All organisational knowledge so the agent can draw on context from across your Atlassian workspace. Disable web search to keep responses grounded in your actual content.
Skills: Enable Update work items. This skill allows the agent to edit Jira issue fields when used interactively via chat. In Jira Automation, this skill cannot be exercised yet — but enabling it now prepares the agent for when that capability arrives.
Part 2: Build the Jira Automation Rule
With the agent ready, go to your project's Space Settings → Automation and create a new rule. Name it "Generate Public Description on Idea Update". The rule has three steps.
Step 1: Trigger — Field Value Changed
Select Field value changed as your trigger and set it up as follows:
Field | Value | Description |
|---|---|---|
Fields to monitor | Description | Select the description field of the work item |
Change type | Any changes to the field value | Monitor any changes to the field value |
For | Edit work item / Create work item | This fires the automation any time a team member edits the Description field on an idea. You can optionally click Add condition to narrow the scope — for example, to only run when ideas are in a specific status. |
Step 2: AI Action — Use a Rovo Agent
Add a "Then" action and choose "Use agent".
Field | Value | Description |
|---|---|---|
Agent | Public summary writer | Select the agent from Part 1 |
Prompt | Any changes to the field value | Write a focused instruction that tells the agent exactly what to produce. |
For | Write a public description for this work item. Don't update the description field, only return the public description text that you generated. | This prompt deliberately tells the agent to return only the generated text — not to write anything back itself. That keeps the step clean and hands off the output to the next step via the |
⚠️ Important caveat: Currently, Rovo agents cannot take actions (such as creating, updating, or deleting Jira items) from within a Jira Automation rule. The "Use agent" step is read-and-generate only — the agent can analyse content and produce text, but it cannot write back to Jira by itself. This is why the next step is required to complete the loop. This limitation is expected to change soon, and in a future update Rovo will be able to act directly within automation rules — making the write-back step unnecessary.
Step 3: Write-Back Action — Edit Work Item Fields
Add an "And" action and choose "Edit work item fields to write the AI-generated text back to the idea:
Click Choose fields to set → select Public description
Set the value to
{{agentResponse}}
At runtime, {{agentResponse}} is replaced with the text produced by the Rovo agent in Step 2, automatically populating the Public Description field.
Full Rule Summary
Step | Component | Configuration |
|---|---|---|
Trigger | Field value changed | Description field · Any change · Edit work item |
Action 1 | Use agent (Rovo) | Agent: Public summary generator · Prompt: return generated public description text only |
Action 2 | Edit work item fields | Public description → |
Why Automate Public Descriptions in Jira?
Most product teams maintain two versions of every idea: a detailed internal description with technical context, acceptance criteria, and team notes — and a shorter, customer-readable summary used in public roadmaps, release notes, or customer portals.
Keeping these in sync manually creates constant overhead and often means the public description lags behind the internal one. This Jira automation with Rovo eliminates that gap by generating a customer-ready summary on every Description update — capped at 250 characters, jargon-free, and focused on user value rather than implementation detail.
Tips for Getting Better Results
Iterate on the agent's Behaviour prompt. The quality of the output depends heavily on how clearly you define the rules. Test different phrasings in Atlassian Studio's built-in Test panel before going live.
Add a status condition to the trigger so the rule only fires for ideas in a "Ready" or "Reviewed" state — preventing half-formed descriptions from being published prematurely.
Check the Audit log regularly. The rule builder's Audit log tab shows every execution and the agent's raw output, making it easy to spot patterns in low-quality results and refine the prompt.
Prepare for full Rovo action support. Once Rovo agents can act within Jira Automation, you'll be able to remove the write-back step and let the agent handle everything end-to-end.
Sharing Your Roadmap
Automating the description is only half the battle. Once you have a polished, "customer-ready" field in Jira, you still need a way to get that information in front of your users without manual copy-pasting.
This is where Released comes in. While Jira is the source of truth for your development, Released is the communication layer. It hooks directly into your Jira environment—specifically the fields you’ve just automated—to transform that data into beautiful, public-facing roadmaps and release notes.
Instead of your public roadmap being a separate spreadsheet or a static slide deck, it becomes a living extension of your Jira workflow. When Rovo updates the description in Jira, Released can automatically pull that change into your public changelog or announcement page.
Frequently Asked Questions
Does this work with all Jira project types?
This setup is built for Jira Product Discovery (Polaris) projects, which have a dedicated Public Description field. The approach can be adapted for other project types using different field targets.
What happens if the Description field is empty?
If the Description field is blank when the trigger fires, the Rovo agent will have no content to summarize. Adding a condition to check that the Description field is not empty before proceeding is a good safeguard.
Can I customize the length or tone of the generated description?
Yes — adjust the Requirements section of the agent's Behaviour prompt. Change the character limit, specify a tone (e.g., "conversational" or "formal"), or add output format instructions to match your brand voice.
Is the AI output always accurate?
Rovo grounds its output in the content of the Description field and will not invent information. That said, AI-generated text should always be reviewed before being published publicly. Use the Audit log to spot-check results.
Use cases
Resources
Backed by


Use cases
Backed by
Use cases
Resources
Backed by