

How to Set Up Your First Jira Discovery Project
I’ve spent a lot of time in product management tools, and there is a specific kind of dread that hits when you open a new Jira Product Discovery (JPD) project for the first time. You’ve finally convinced your leadership to move away from that chaotic "Roadmap_V3_FINAL.xlsx" spreadsheet. You’re ready to be data-driven. Then, you click "Create," and you’re met with a vast, white expanse of nothing (aside from those pesky example ideas you get with every project).
No ideas. No scores. No roadmap. Just a blinking cursor and a "Create Idea" button.
This is the "Blank Slate" problem. If you start without a plan, you’ll end up with a system that creates more work than it saves. You’ll have dozens of fields, a roadmap that no one understands, and a team that goes back to sending you ideas via DM because the tool is too hard to use.
At Released, we think about the "Discovery to Delivery" loop every day. We’ve seen that the most successful teams don't just "use" JPD; they treat it as an operating system for their strategy. This guide is a deep dive into how to build that system from the ground up. We’re moving past basic settings and looking at the architecture of a project that actually scales.
Step 1: The People Layer – Architecting Roles and Economics
Before you define a single feature, you have to define who is allowed to touch the steering wheel. JPD works differently than the Jira you’re used to for software development. In discovery, we aren't just moving tickets; we are managing the flow of information and the cost of seats.
The Logic of Creators and Contributors
Atlassian built JPD with a very specific (and helpful) economic model. You have two types of people in your project, and getting this right is the difference between a high-ROI tool and a budget leak.
Creators (The Strategic Architects): These are your paid seats. Think Product Managers, Product Owners, or Product Ops. These people can change the "rules of the game." They create fields, build scoring formulas, and decide how the roadmap looks. They have full read/write access to everything.
Contributors (The Business Voice): These seats are free and unlimited. This is a massive shift in how product tools work. You should invite your entire Sales team, Support team, and Marketing team as Contributors. They can see the ideas, leave comments, vote, and—most importantly—submit evidence.
The "Title" Trap:
I once worked with a company where the CEO insisted every VP be a "Creator." Within two weeks, the roadmap was a mess because five different people were creating their own "Priority" fields. Titles don't matter here; actions do. If they aren't grooming the backlog, they should be a Contributor.
Setting Up the Guardrails
When you initialize your project, go to the settings and look at the "Create" permissions. You want to make a choice: can your free Contributors create new "Ideas" or just "Insights"?
For a first project, I suggest letting them create Ideas. It builds a culture of participation. People feel like their voice matters. If, after 90 days, your backlog is full of junk, you can tighten the screws and force them to submit "Insights" (evidence) instead of full-blown "Ideas." But for the start, leave the door open.
Step 2: The Instantiation Layer – Why Templates Win
When you start the project, JPD will ask if you want a "Blank Project" or a "Product Discovery" template.
Take the template.
I’ve seen "power users" try to go the blank route because they want a clean namespace. They spend the next four hours manually recreating the "Impact" and "Effort" fields that the template gives you for free. The template shows you how the developers intended the tool to be used. It seeds your project with the "Value vs. Effort" logic that is the industry standard for a reason.
The Psychology of the Template
The real value of the template is momentum. When you use the template, you immediately see a Matrix view. It’s empty, but the axes are labeled. It’s much easier to explain the tool to your stakeholders when you can show them a visual representation of a strategy, even if it’s just a placeholder. You can always rename "Impact" to "User Value" later. It’s much harder to invent a scoring logic from a white screen.
Step 3: The Data Model – Designing a Robust Taxonomy
This is where most teams get lost. They start adding every field they can think of. "Is this for Enterprise?" "Which region?" "How many tickets?" Before they know it, they have a data model that requires 20 minutes of work just to add a single idea.
A good discovery architecture is built on a few high-leverage fields. You want enough data to make a decision, but not so much that you stop entering data altogether.
The "Prioritization Trio"
I recommend every first project starts with these three specific fields:
Impact (1-5 Rating): This is subjective, and that's okay. It’s a gut check. How much does this move the needle for our users?
Effort (1-5 Rating): Ask your tech lead to eyeball this. We aren't looking for story points yet; we’re looking for "T-shirt sizing."
Confidence (0-100% Slider): This is the most important field in JPD. It’s the "honesty" metric. If you have a high impact score but a 10% confidence score, you know you need to go do more research before you write a single line of code.
The Strategic Goal Field
You must create a single-select field called "Goal." Do not leave this empty. Populate it with your company's current OKRs. For example: "Increase Top-of-Funnel," "Reduce Churn," or "Mobile Parity."
If an idea doesn't map to a goal, it shouldn't be on the roadmap. This simple field gives you the "permission to say no" that every PM needs. When a stakeholder asks why their favorite feature isn't being built, you can show them that it doesn't align with the current quarterly goals.
Formula Fields: The Math of Decision Making
Once you have those three fields, you can create a "Priority Score." JPD lets you use Excel-style math. A common one is: ({Impact} * {Confidence}) / {Effort}.
This creates a weighted score. An idea that is high-impact and low-effort will bubble to the top, but only if you are confident about the data. If your confidence is low, the math will drag the priority down. It’s a beautiful way to keep everyone honest.
Step 4: The Visualization Layer – Lenses for Different Eyes
One of the biggest mistakes PMs make is showing the same roadmap to everyone. Your developers need detail; your CEO needs a summary. Architecture is about building different "views" of the same data.
The 4 Essential Views
Your first project should have these four views configured before you invite anyone else to look at it:
View Name | Who is it for? | The Value Proposition |
|---|---|---|
Triage List | The PM | A dense list of everything new. This is your "Inbox." You use it to clean up titles and add initial scores. |
The Matrix | The Leadership Team | A visual graph of Impact vs. Effort. This is where you have the "Quick Win" vs. "Strategic Bet" conversation. |
Public Roadmap | The Whole Company | A board view grouped by "Now / Next / Later." Hide the scores here. Focus on the themes. |
Timeline | Engineering Leads | A calendar view to see if you are scheduling too much at once. It helps prevent burnout. |
Remember: You can "Publish" a view. This creates a read-only URL. This is how you share the roadmap with the company without giving them access to the "messy" triage list where you’re still figuring things out.
For a deep dive on views, read the Practical Jira Product Discovery Views Guide.
Step 5: The Ingestion Engine – From Manual to Automated Discovery
The final step in your architecture is how you get data *into* the system. This is where most discovery processes die. If it’s hard to submit an idea, people won't do it. You have two main ways to handle this, and you should use both: the "Manual" way and the "Advanced" way.
The Manual Way: The Chrome Extension
The JPD Chrome Extension is your internal tool. It’s great for when you’re browsing a competitor’s site, reading a tech article, or looking at a Slack message. You highlight some text, click the icon, and it creates an "Insight" in Jira.
This is perfect for the product team. It helps you collect "clippings" from around the web. But it’s manual. You have to remember to do it. You have to find the right idea to attach it to. It’s a "push" system—you are pushing data into Jira.
The Advanced Way: The Released.so Feedback Engine
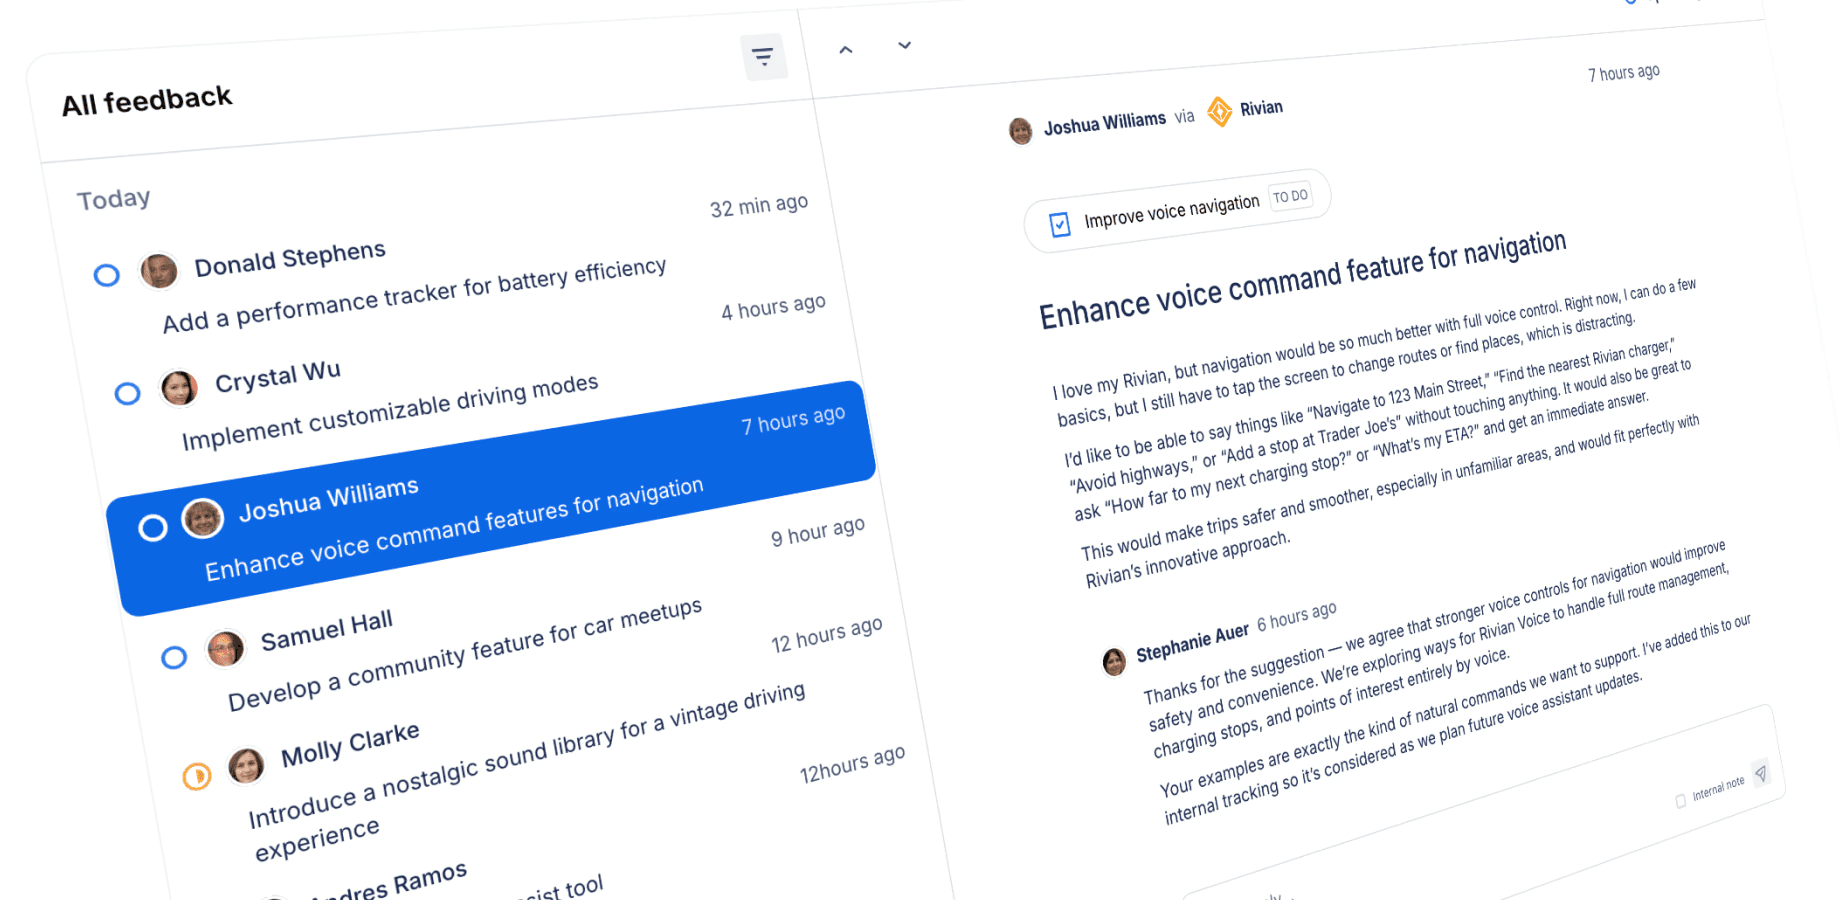
If the Chrome Extension is for your internal team, Released is for your customers. This is the "pull" system. Instead of you manually hunting for insights, you create a direct pipeline from your users straight into your JPD architecture.
We built Released to bridge the gap between what you’re planning and what your users are actually saying. Here is how it upgrades your discovery architecture:
The Feedback Inbox: Instead of feedback being buried in support tickets or emails, Released gives you a central Inbox. When a customer sends a suggestion, it doesn't stay in a silos. You can reply to them and, with one click, turn that feedback into a JPD Insight.
The Wishlist: Most teams use a public voting board, but those often turn into a "who has the most friends" contest. Released uses a Wishlist. Users can "wish" for features on your roadmap. Behind the scenes, we sync that "Wish Count" directly to a field in JPD. Now, your "Impact" score is backed by real, quantitative demand from your actual user base.
Roadmap Feedback: When you share your "Next" or "Later" items through Released, customers can leave comments directly on those items. This data flows back into JPD as an Insight. You aren't guessing if a feature is a good idea; you have a running list of customer quotes waiting for you when you start the build.
The real power of using Released over just the Chrome extension is the "Feedback Loop." When you eventually finish the feature and publish your release notes through Released, the system knows exactly who asked for that feature. It can close the loop and tell them, "Hey, we built this because of you." That is something a browser extension simply can't do.
Bringing it All Together
Setting up your first project isn't about being perfect on day one. It’s about building a structure that can grow. If you follow this 5-step checklist, you’ll have a project that is economically efficient, strategically aligned, and fueled by a constant stream of customer evidence.
You’ll move from a world where you're "guessing what to build" to a world where you're "architecting what to build." And once that work is done, you’ll have all the context you need to write amazing release notes that show your customers you’re actually listening.
Your Implementation Checklist
[ ] Roles: Assign 2-3 Creators and make everyone else a Contributor.
[ ] Template: Start with the "Product Discovery" template.
[ ] Fields: Set up Impact (1-5), Effort (1-5), Confidence (%), and Goal (Select).
[ ] Views: Build your Triage, Matrix, Roadmap, and Timeline views.
[ ] Ingestion: Install the JPD Chrome extension for your internal team, then set up your Released Feedback Portal to start collecting evidence directly from your users.
How to Set Up Your First Jira Discovery Project
I’ve spent a lot of time in product management tools, and there is a specific kind of dread that hits when you open a new Jira Product Discovery (JPD) project for the first time. You’ve finally convinced your leadership to move away from that chaotic "Roadmap_V3_FINAL.xlsx" spreadsheet. You’re ready to be data-driven. Then, you click "Create," and you’re met with a vast, white expanse of nothing (aside from those pesky example ideas you get with every project).
No ideas. No scores. No roadmap. Just a blinking cursor and a "Create Idea" button.
This is the "Blank Slate" problem. If you start without a plan, you’ll end up with a system that creates more work than it saves. You’ll have dozens of fields, a roadmap that no one understands, and a team that goes back to sending you ideas via DM because the tool is too hard to use.
At Released, we think about the "Discovery to Delivery" loop every day. We’ve seen that the most successful teams don't just "use" JPD; they treat it as an operating system for their strategy. This guide is a deep dive into how to build that system from the ground up. We’re moving past basic settings and looking at the architecture of a project that actually scales.
Step 1: The People Layer – Architecting Roles and Economics
Before you define a single feature, you have to define who is allowed to touch the steering wheel. JPD works differently than the Jira you’re used to for software development. In discovery, we aren't just moving tickets; we are managing the flow of information and the cost of seats.
The Logic of Creators and Contributors
Atlassian built JPD with a very specific (and helpful) economic model. You have two types of people in your project, and getting this right is the difference between a high-ROI tool and a budget leak.
Creators (The Strategic Architects): These are your paid seats. Think Product Managers, Product Owners, or Product Ops. These people can change the "rules of the game." They create fields, build scoring formulas, and decide how the roadmap looks. They have full read/write access to everything.
Contributors (The Business Voice): These seats are free and unlimited. This is a massive shift in how product tools work. You should invite your entire Sales team, Support team, and Marketing team as Contributors. They can see the ideas, leave comments, vote, and—most importantly—submit evidence.
The "Title" Trap:
I once worked with a company where the CEO insisted every VP be a "Creator." Within two weeks, the roadmap was a mess because five different people were creating their own "Priority" fields. Titles don't matter here; actions do. If they aren't grooming the backlog, they should be a Contributor.
Setting Up the Guardrails
When you initialize your project, go to the settings and look at the "Create" permissions. You want to make a choice: can your free Contributors create new "Ideas" or just "Insights"?
For a first project, I suggest letting them create Ideas. It builds a culture of participation. People feel like their voice matters. If, after 90 days, your backlog is full of junk, you can tighten the screws and force them to submit "Insights" (evidence) instead of full-blown "Ideas." But for the start, leave the door open.
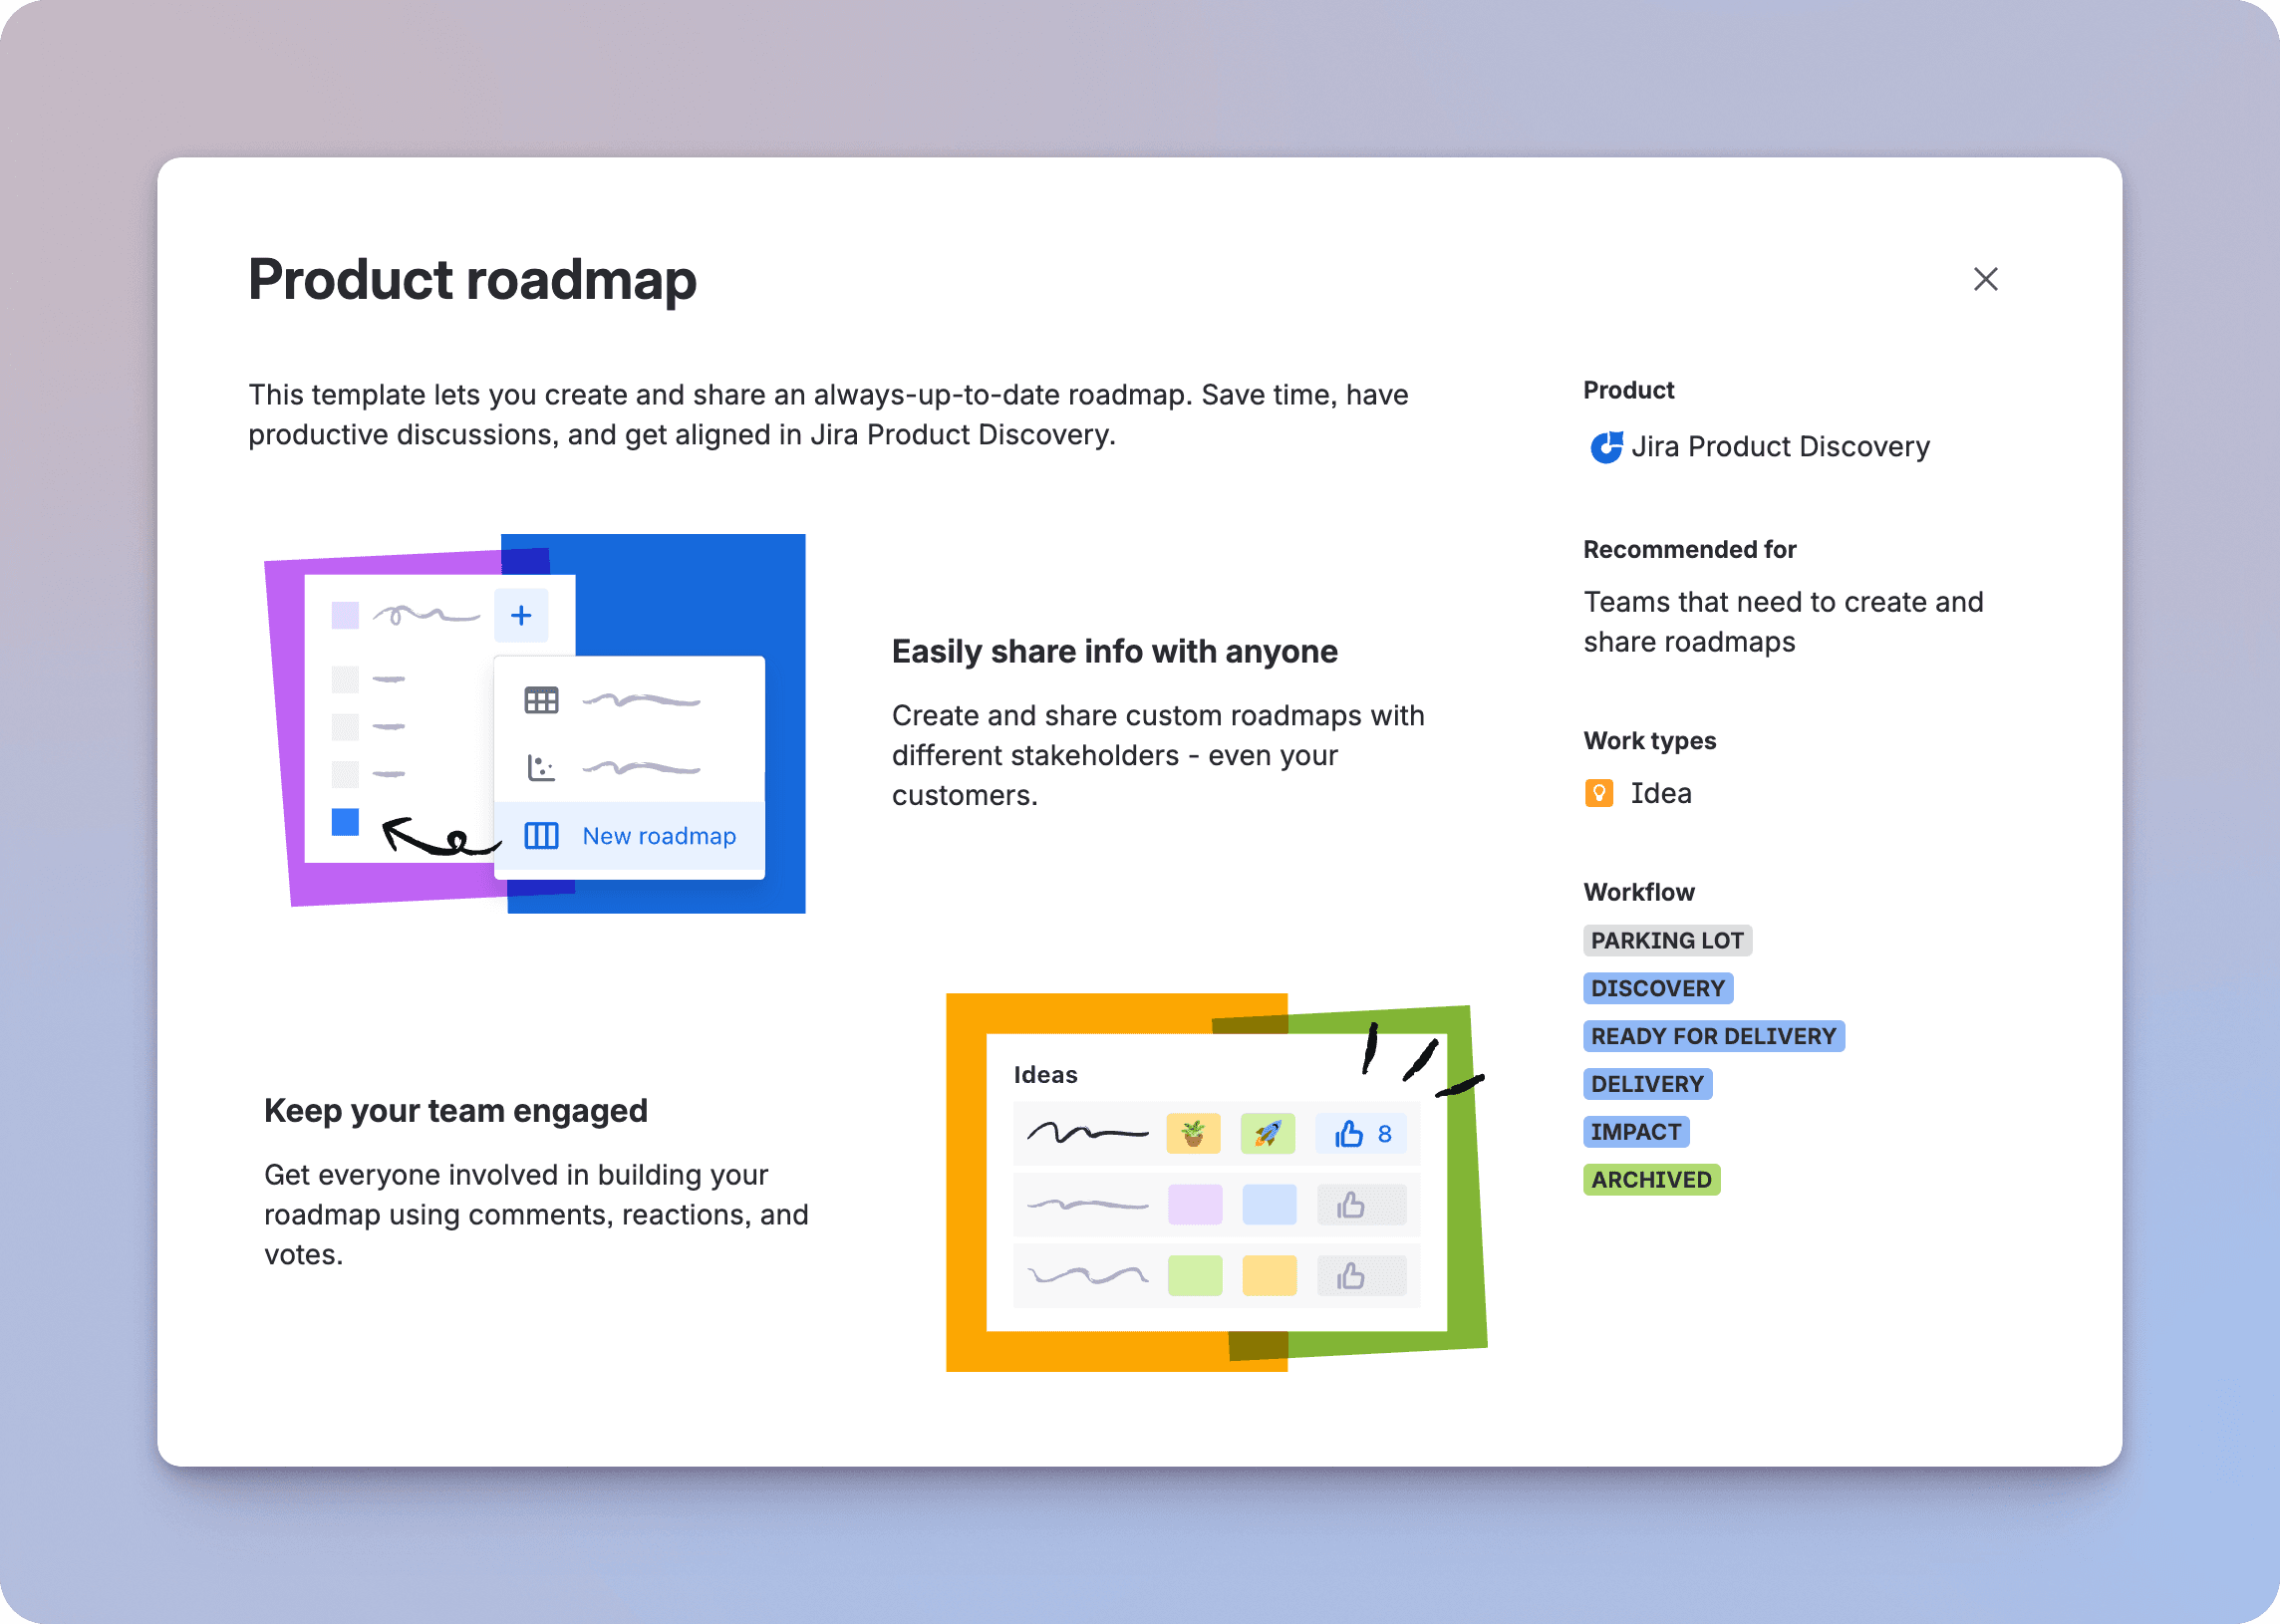
Step 2: The Instantiation Layer – Why Templates Win
When you start the project, JPD will ask if you want a "Blank Project" or a "Product Discovery" template.
Take the template.
I’ve seen "power users" try to go the blank route because they want a clean namespace. They spend the next four hours manually recreating the "Impact" and "Effort" fields that the template gives you for free. The template shows you how the developers intended the tool to be used. It seeds your project with the "Value vs. Effort" logic that is the industry standard for a reason.
The Psychology of the Template
The real value of the template is momentum. When you use the template, you immediately see a Matrix view. It’s empty, but the axes are labeled. It’s much easier to explain the tool to your stakeholders when you can show them a visual representation of a strategy, even if it’s just a placeholder. You can always rename "Impact" to "User Value" later. It’s much harder to invent a scoring logic from a white screen.
Step 3: The Data Model – Designing a Robust Taxonomy
This is where most teams get lost. They start adding every field they can think of. "Is this for Enterprise?" "Which region?" "How many tickets?" Before they know it, they have a data model that requires 20 minutes of work just to add a single idea.
A good discovery architecture is built on a few high-leverage fields. You want enough data to make a decision, but not so much that you stop entering data altogether.
The "Prioritization Trio"
I recommend every first project starts with these three specific fields:
Impact (1-5 Rating): This is subjective, and that's okay. It’s a gut check. How much does this move the needle for our users?
Effort (1-5 Rating): Ask your tech lead to eyeball this. We aren't looking for story points yet; we’re looking for "T-shirt sizing."
Confidence (0-100% Slider): This is the most important field in JPD. It’s the "honesty" metric. If you have a high impact score but a 10% confidence score, you know you need to go do more research before you write a single line of code.
The Strategic Goal Field
You must create a single-select field called "Goal." Do not leave this empty. Populate it with your company's current OKRs. For example: "Increase Top-of-Funnel," "Reduce Churn," or "Mobile Parity."
If an idea doesn't map to a goal, it shouldn't be on the roadmap. This simple field gives you the "permission to say no" that every PM needs. When a stakeholder asks why their favorite feature isn't being built, you can show them that it doesn't align with the current quarterly goals.
Formula Fields: The Math of Decision Making
Once you have those three fields, you can create a "Priority Score." JPD lets you use Excel-style math. A common one is: ({Impact} * {Confidence}) / {Effort}.
This creates a weighted score. An idea that is high-impact and low-effort will bubble to the top, but only if you are confident about the data. If your confidence is low, the math will drag the priority down. It’s a beautiful way to keep everyone honest.
Step 4: The Visualization Layer – Lenses for Different Eyes
One of the biggest mistakes PMs make is showing the same roadmap to everyone. Your developers need detail; your CEO needs a summary. Architecture is about building different "views" of the same data.
The 4 Essential Views
Your first project should have these four views configured before you invite anyone else to look at it:
View Name | Who is it for? | The Value Proposition |
|---|---|---|
Triage List | The PM | A dense list of everything new. This is your "Inbox." You use it to clean up titles and add initial scores. |
The Matrix | The Leadership Team | A visual graph of Impact vs. Effort. This is where you have the "Quick Win" vs. "Strategic Bet" conversation. |
Public Roadmap | The Whole Company | A board view grouped by "Now / Next / Later." Hide the scores here. Focus on the themes. |
Timeline | Engineering Leads | A calendar view to see if you are scheduling too much at once. It helps prevent burnout. |
Remember: You can "Publish" a view. This creates a read-only URL. This is how you share the roadmap with the company without giving them access to the "messy" triage list where you’re still figuring things out.
For a deep dive on views, read the Practical Jira Product Discovery Views Guide.
Step 5: The Ingestion Engine – From Manual to Automated Discovery
The final step in your architecture is how you get data *into* the system. This is where most discovery processes die. If it’s hard to submit an idea, people won't do it. You have two main ways to handle this, and you should use both: the "Manual" way and the "Advanced" way.
The Manual Way: The Chrome Extension
The JPD Chrome Extension is your internal tool. It’s great for when you’re browsing a competitor’s site, reading a tech article, or looking at a Slack message. You highlight some text, click the icon, and it creates an "Insight" in Jira.
This is perfect for the product team. It helps you collect "clippings" from around the web. But it’s manual. You have to remember to do it. You have to find the right idea to attach it to. It’s a "push" system—you are pushing data into Jira.
The Advanced Way: The Released.so Feedback Engine
If the Chrome Extension is for your internal team, Released is for your customers. This is the "pull" system. Instead of you manually hunting for insights, you create a direct pipeline from your users straight into your JPD architecture.
We built Released to bridge the gap between what you’re planning and what your users are actually saying. Here is how it upgrades your discovery architecture:
The Feedback Inbox: Instead of feedback being buried in support tickets or emails, Released gives you a central Inbox. When a customer sends a suggestion, it doesn't stay in a silos. You can reply to them and, with one click, turn that feedback into a JPD Insight.
The Wishlist: Most teams use a public voting board, but those often turn into a "who has the most friends" contest. Released uses a Wishlist. Users can "wish" for features on your roadmap. Behind the scenes, we sync that "Wish Count" directly to a field in JPD. Now, your "Impact" score is backed by real, quantitative demand from your actual user base.
Roadmap Feedback: When you share your "Next" or "Later" items through Released, customers can leave comments directly on those items. This data flows back into JPD as an Insight. You aren't guessing if a feature is a good idea; you have a running list of customer quotes waiting for you when you start the build.
The real power of using Released over just the Chrome extension is the "Feedback Loop." When you eventually finish the feature and publish your release notes through Released, the system knows exactly who asked for that feature. It can close the loop and tell them, "Hey, we built this because of you." That is something a browser extension simply can't do.
Bringing it All Together
Setting up your first project isn't about being perfect on day one. It’s about building a structure that can grow. If you follow this 5-step checklist, you’ll have a project that is economically efficient, strategically aligned, and fueled by a constant stream of customer evidence.
You’ll move from a world where you're "guessing what to build" to a world where you're "architecting what to build." And once that work is done, you’ll have all the context you need to write amazing release notes that show your customers you’re actually listening.
Your Implementation Checklist
[ ] Roles: Assign 2-3 Creators and make everyone else a Contributor.
[ ] Template: Start with the "Product Discovery" template.
[ ] Fields: Set up Impact (1-5), Effort (1-5), Confidence (%), and Goal (Select).
[ ] Views: Build your Triage, Matrix, Roadmap, and Timeline views.
[ ] Ingestion: Install the JPD Chrome extension for your internal team, then set up your Released Feedback Portal to start collecting evidence directly from your users.
How to Set Up Your First Jira Discovery Project
I’ve spent a lot of time in product management tools, and there is a specific kind of dread that hits when you open a new Jira Product Discovery (JPD) project for the first time. You’ve finally convinced your leadership to move away from that chaotic "Roadmap_V3_FINAL.xlsx" spreadsheet. You’re ready to be data-driven. Then, you click "Create," and you’re met with a vast, white expanse of nothing (aside from those pesky example ideas you get with every project).
No ideas. No scores. No roadmap. Just a blinking cursor and a "Create Idea" button.
This is the "Blank Slate" problem. If you start without a plan, you’ll end up with a system that creates more work than it saves. You’ll have dozens of fields, a roadmap that no one understands, and a team that goes back to sending you ideas via DM because the tool is too hard to use.
At Released, we think about the "Discovery to Delivery" loop every day. We’ve seen that the most successful teams don't just "use" JPD; they treat it as an operating system for their strategy. This guide is a deep dive into how to build that system from the ground up. We’re moving past basic settings and looking at the architecture of a project that actually scales.
Step 1: The People Layer – Architecting Roles and Economics
Before you define a single feature, you have to define who is allowed to touch the steering wheel. JPD works differently than the Jira you’re used to for software development. In discovery, we aren't just moving tickets; we are managing the flow of information and the cost of seats.
The Logic of Creators and Contributors
Atlassian built JPD with a very specific (and helpful) economic model. You have two types of people in your project, and getting this right is the difference between a high-ROI tool and a budget leak.
Creators (The Strategic Architects): These are your paid seats. Think Product Managers, Product Owners, or Product Ops. These people can change the "rules of the game." They create fields, build scoring formulas, and decide how the roadmap looks. They have full read/write access to everything.
Contributors (The Business Voice): These seats are free and unlimited. This is a massive shift in how product tools work. You should invite your entire Sales team, Support team, and Marketing team as Contributors. They can see the ideas, leave comments, vote, and—most importantly—submit evidence.
The "Title" Trap:
I once worked with a company where the CEO insisted every VP be a "Creator." Within two weeks, the roadmap was a mess because five different people were creating their own "Priority" fields. Titles don't matter here; actions do. If they aren't grooming the backlog, they should be a Contributor.
Setting Up the Guardrails
When you initialize your project, go to the settings and look at the "Create" permissions. You want to make a choice: can your free Contributors create new "Ideas" or just "Insights"?
For a first project, I suggest letting them create Ideas. It builds a culture of participation. People feel like their voice matters. If, after 90 days, your backlog is full of junk, you can tighten the screws and force them to submit "Insights" (evidence) instead of full-blown "Ideas." But for the start, leave the door open.
Step 2: The Instantiation Layer – Why Templates Win
When you start the project, JPD will ask if you want a "Blank Project" or a "Product Discovery" template.
Take the template.
I’ve seen "power users" try to go the blank route because they want a clean namespace. They spend the next four hours manually recreating the "Impact" and "Effort" fields that the template gives you for free. The template shows you how the developers intended the tool to be used. It seeds your project with the "Value vs. Effort" logic that is the industry standard for a reason.
The Psychology of the Template
The real value of the template is momentum. When you use the template, you immediately see a Matrix view. It’s empty, but the axes are labeled. It’s much easier to explain the tool to your stakeholders when you can show them a visual representation of a strategy, even if it’s just a placeholder. You can always rename "Impact" to "User Value" later. It’s much harder to invent a scoring logic from a white screen.
Step 3: The Data Model – Designing a Robust Taxonomy
This is where most teams get lost. They start adding every field they can think of. "Is this for Enterprise?" "Which region?" "How many tickets?" Before they know it, they have a data model that requires 20 minutes of work just to add a single idea.
A good discovery architecture is built on a few high-leverage fields. You want enough data to make a decision, but not so much that you stop entering data altogether.
The "Prioritization Trio"
I recommend every first project starts with these three specific fields:
Impact (1-5 Rating): This is subjective, and that's okay. It’s a gut check. How much does this move the needle for our users?
Effort (1-5 Rating): Ask your tech lead to eyeball this. We aren't looking for story points yet; we’re looking for "T-shirt sizing."
Confidence (0-100% Slider): This is the most important field in JPD. It’s the "honesty" metric. If you have a high impact score but a 10% confidence score, you know you need to go do more research before you write a single line of code.
The Strategic Goal Field
You must create a single-select field called "Goal." Do not leave this empty. Populate it with your company's current OKRs. For example: "Increase Top-of-Funnel," "Reduce Churn," or "Mobile Parity."
If an idea doesn't map to a goal, it shouldn't be on the roadmap. This simple field gives you the "permission to say no" that every PM needs. When a stakeholder asks why their favorite feature isn't being built, you can show them that it doesn't align with the current quarterly goals.
Formula Fields: The Math of Decision Making
Once you have those three fields, you can create a "Priority Score." JPD lets you use Excel-style math. A common one is: ({Impact} * {Confidence}) / {Effort}.
This creates a weighted score. An idea that is high-impact and low-effort will bubble to the top, but only if you are confident about the data. If your confidence is low, the math will drag the priority down. It’s a beautiful way to keep everyone honest.
Step 4: The Visualization Layer – Lenses for Different Eyes
One of the biggest mistakes PMs make is showing the same roadmap to everyone. Your developers need detail; your CEO needs a summary. Architecture is about building different "views" of the same data.
The 4 Essential Views
Your first project should have these four views configured before you invite anyone else to look at it:
View Name | Who is it for? | The Value Proposition |
|---|---|---|
Triage List | The PM | A dense list of everything new. This is your "Inbox." You use it to clean up titles and add initial scores. |
The Matrix | The Leadership Team | A visual graph of Impact vs. Effort. This is where you have the "Quick Win" vs. "Strategic Bet" conversation. |
Public Roadmap | The Whole Company | A board view grouped by "Now / Next / Later." Hide the scores here. Focus on the themes. |
Timeline | Engineering Leads | A calendar view to see if you are scheduling too much at once. It helps prevent burnout. |
Remember: You can "Publish" a view. This creates a read-only URL. This is how you share the roadmap with the company without giving them access to the "messy" triage list where you’re still figuring things out.
For a deep dive on views, read the Practical Jira Product Discovery Views Guide.
Step 5: The Ingestion Engine – From Manual to Automated Discovery
The final step in your architecture is how you get data *into* the system. This is where most discovery processes die. If it’s hard to submit an idea, people won't do it. You have two main ways to handle this, and you should use both: the "Manual" way and the "Advanced" way.
The Manual Way: The Chrome Extension
The JPD Chrome Extension is your internal tool. It’s great for when you’re browsing a competitor’s site, reading a tech article, or looking at a Slack message. You highlight some text, click the icon, and it creates an "Insight" in Jira.
This is perfect for the product team. It helps you collect "clippings" from around the web. But it’s manual. You have to remember to do it. You have to find the right idea to attach it to. It’s a "push" system—you are pushing data into Jira.
The Advanced Way: The Released.so Feedback Engine
If the Chrome Extension is for your internal team, Released is for your customers. This is the "pull" system. Instead of you manually hunting for insights, you create a direct pipeline from your users straight into your JPD architecture.
We built Released to bridge the gap between what you’re planning and what your users are actually saying. Here is how it upgrades your discovery architecture:
The Feedback Inbox: Instead of feedback being buried in support tickets or emails, Released gives you a central Inbox. When a customer sends a suggestion, it doesn't stay in a silos. You can reply to them and, with one click, turn that feedback into a JPD Insight.
The Wishlist: Most teams use a public voting board, but those often turn into a "who has the most friends" contest. Released uses a Wishlist. Users can "wish" for features on your roadmap. Behind the scenes, we sync that "Wish Count" directly to a field in JPD. Now, your "Impact" score is backed by real, quantitative demand from your actual user base.
Roadmap Feedback: When you share your "Next" or "Later" items through Released, customers can leave comments directly on those items. This data flows back into JPD as an Insight. You aren't guessing if a feature is a good idea; you have a running list of customer quotes waiting for you when you start the build.
The real power of using Released over just the Chrome extension is the "Feedback Loop." When you eventually finish the feature and publish your release notes through Released, the system knows exactly who asked for that feature. It can close the loop and tell them, "Hey, we built this because of you." That is something a browser extension simply can't do.
Bringing it All Together
Setting up your first project isn't about being perfect on day one. It’s about building a structure that can grow. If you follow this 5-step checklist, you’ll have a project that is economically efficient, strategically aligned, and fueled by a constant stream of customer evidence.
You’ll move from a world where you're "guessing what to build" to a world where you're "architecting what to build." And once that work is done, you’ll have all the context you need to write amazing release notes that show your customers you’re actually listening.
Your Implementation Checklist
[ ] Roles: Assign 2-3 Creators and make everyone else a Contributor.
[ ] Template: Start with the "Product Discovery" template.
[ ] Fields: Set up Impact (1-5), Effort (1-5), Confidence (%), and Goal (Select).
[ ] Views: Build your Triage, Matrix, Roadmap, and Timeline views.
[ ] Ingestion: Install the JPD Chrome extension for your internal team, then set up your Released Feedback Portal to start collecting evidence directly from your users.
Use cases
Resources
Backed by


Use cases
Backed by
Use cases
Resources
Backed by